> For the complete documentation index, see [llms.txt](https://lesson.longruncode.com/llms.txt). Markdown versions of documentation pages are available by appending `.md` to page URLs; this page is available as [Markdown](https://lesson.longruncode.com/basic-swift-programming/swift.md).
# เริ่มต้นไปกับภาษา Swift
Table of content
[#why](#why "mention")
[#undefined](#undefined "mention")
[#playground](#playground "mention")
[#data-types](#data-types "mention")
[#strings-and-string-interpolation](#strings-and-string-interpolation "mention")
[#control-flow](#control-flow "mention")
[#functions](#functions "mention")
[#summary](#summary "mention")
ก่อนหน้านี้นักพัฒนารุ่นก่อน ๆ จะใช้ภาษาที่ชื่อว่า **Objective-C** ในการพัฒนาแอปพลิเคชั่น ซึ่งเป็นภาษาค่อนข้างเก่าตั้งแต่ยุค 1980 และเป็นภาษาที่ไม่มี feature เหมือนภาษารุ่นใหม่ ๆ โดยปี 2010 ภาษา swift ถูกพัฒนาขึ้นมาโดย **Chris Lattner** และ programmer ภายในบริษัท Apple เพื่อทดแทนภาษาเดิมและได้ถูกนำไปใช้ในการสร้างแอปพลิเคชั่นบนระบบปฏิบัติการ iOS, macOS, watchOS และ tvOS อีกทั้งโครงการนี้ได้รับการปรับปรุงจาก open source community
{% hint style="info" %}
PROGRAMMING WORDING
Open Source คือ การเปิดเผยให้นักพัฒนาคนอื่นเห็นโค้ดและช่วยกันพัฒนาต่อ
{% endhint %}
## ทำไมเราต้องเรียนรู้ Swift
ถ้าคุณต้องการพัฒนา application สำหรับ iOS, macOS, watchOS และ tvOS นั้นแหละคือคำตอบว่าทำไมคุณต้องเรียนรู้ Swift
## เตรียมเครื่องพร้อมลุย!
ก่อนที่เราจะไปเริ่มเขียนโค้ดกัน เรามาติดตั้งโปรแกรมสำหรับการเขียนกันก่อนเลย การเขียนโปรแกรมภาษา Swift นั้นจำเป็นที่จะต้องใช้ macOS และโปรแกรม XCode [ดาวน์โหลดได้ที่นี้](https://developer.apple.com/xcode/)
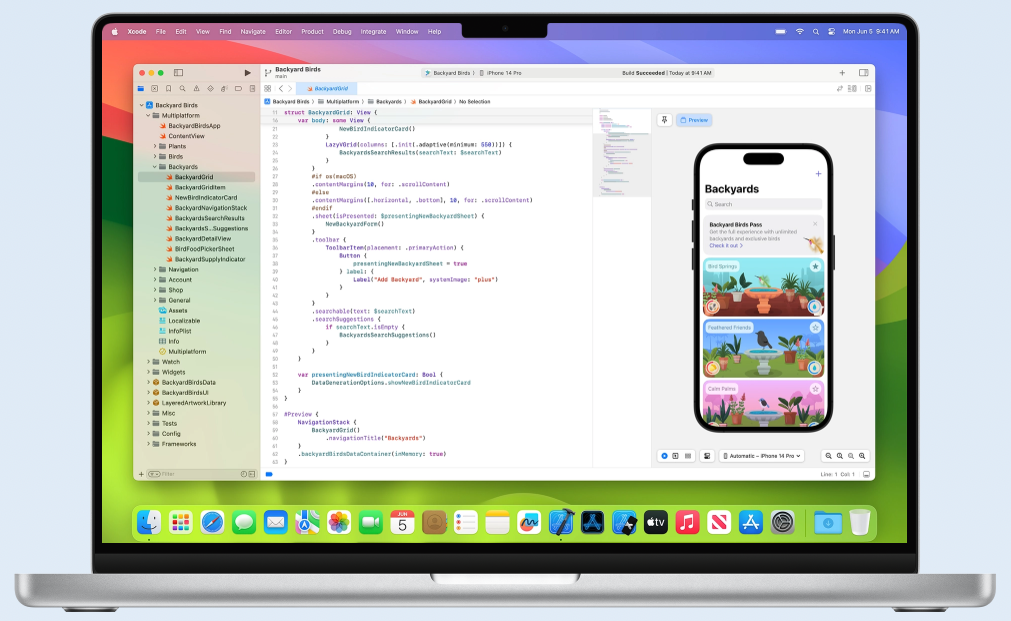 XCode คือโปรแกรม Integrated Development Environment หรือเรียนสั้น ๆ ว่า IDE โดยที่โปรแกรมนี้จะรวบรวมเครื่องมือที่จำเป็นในการพัฒนาแอปพลิเคชั่นไว้ให้เรียบร้อย ง่าย สะดวก รวดเร็ว
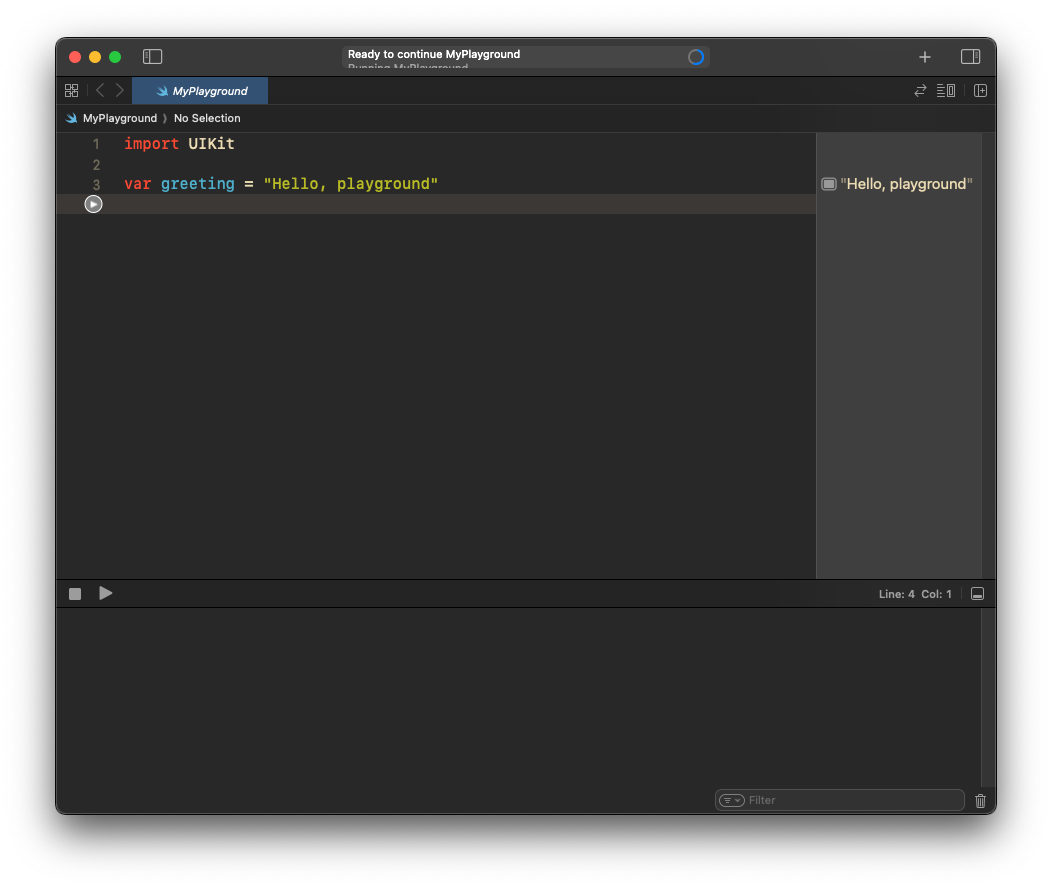
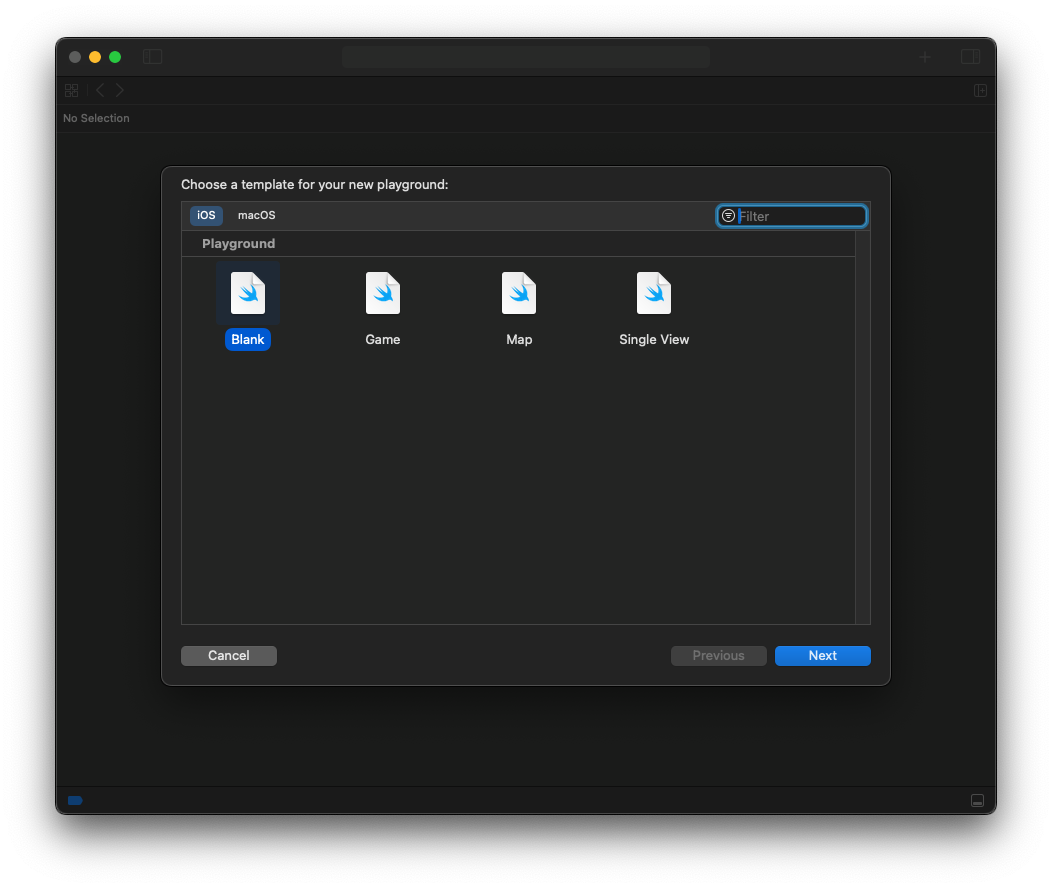
สร้าง Playground สำหรับเรียนรู้ภาษา Swift เบื้องต้น ในบทนี้ผมจะพามารู้จัก syntax ของภาษาอย่างง่าย เพื่อสร้างความน่าสนใจให้กับผู้อ่านได้ติดตามต่อไป
{% hint style="info" %}
PROGRAMMING WORDING
**Syntax คือ ไวยากรณ์ของภาษา** เช่นการ print\
**ภาษา C**
```c
printf("Hello World!")
```
**ภาษา Java**
```java
System.out.println("Hello World!");
```
**ภาษา TypeScript**
```typescript
console.log("Hello World!");
```
{% endhint %}
## Playground คืออะไร
คล้ายกับสนามเด็กเล่น…เป็นไฟล์โปรเจคที่เอาไว้เขียนโปรแกรมเพื่อทำการเรียนรู้ หรือ ทดสอบ ยกตัวอย่างเช่นเราต้องการทดสอบว่า algorithm ที่เราคิดมานั้นมันใช้ง่ายได้จริงไหม หรือ การทดสอบ syntax ของ function บางตัวว่าทำงานอย่างไร
Hello World! หลังจากที่ได้สร้าง Playground มาแล้วนั้น ได้เวลาที่เราจะทักทายชาวโลกกันหน่อย
```swift
print(“Hello World!”)
```
เป็นคำสั่งที่เอาไว้แสดงผลออกทางหน้าจอ เป็นอย่างไรบ้าง…เริ่มสนุกหรือยัง?
XCode คือโปรแกรม Integrated Development Environment หรือเรียนสั้น ๆ ว่า IDE โดยที่โปรแกรมนี้จะรวบรวมเครื่องมือที่จำเป็นในการพัฒนาแอปพลิเคชั่นไว้ให้เรียบร้อย ง่าย สะดวก รวดเร็ว
สร้าง Playground สำหรับเรียนรู้ภาษา Swift เบื้องต้น ในบทนี้ผมจะพามารู้จัก syntax ของภาษาอย่างง่าย เพื่อสร้างความน่าสนใจให้กับผู้อ่านได้ติดตามต่อไป
{% hint style="info" %}
PROGRAMMING WORDING
**Syntax คือ ไวยากรณ์ของภาษา** เช่นการ print\
**ภาษา C**
```c
printf("Hello World!")
```
**ภาษา Java**
```java
System.out.println("Hello World!");
```
**ภาษา TypeScript**
```typescript
console.log("Hello World!");
```
{% endhint %}
## Playground คืออะไร
คล้ายกับสนามเด็กเล่น…เป็นไฟล์โปรเจคที่เอาไว้เขียนโปรแกรมเพื่อทำการเรียนรู้ หรือ ทดสอบ ยกตัวอย่างเช่นเราต้องการทดสอบว่า algorithm ที่เราคิดมานั้นมันใช้ง่ายได้จริงไหม หรือ การทดสอบ syntax ของ function บางตัวว่าทำงานอย่างไร
Hello World! หลังจากที่ได้สร้าง Playground มาแล้วนั้น ได้เวลาที่เราจะทักทายชาวโลกกันหน่อย
```swift
print(“Hello World!”)
```
เป็นคำสั่งที่เอาไว้แสดงผลออกทางหน้าจอ เป็นอย่างไรบ้าง…เริ่มสนุกหรือยัง?
 ## ประเภทของข้อมูล (Data Types)
ใน Swift มีประเภทข้อมูลหลายชนิด เช่น
* Int: ตัวเลขจำนวนเต็ม
* Float และ Double: ตัวเลขทศนิยม
* Bool: ค่าบูลีน (true หรือ false)
* String: ชุดของตัวอักษร
ในบทต่อไปผมจะพาไปดู data type ชนิดอื่น ๆ อีกครั้ง
```swift
let anInteger: Int = 100
let aDouble: Double = 3.14
let aBoolean: Bool = true
let aString: String = "Hello, World!"
```
## สตริงและการแทรกสตริง (Strings and String Interpolation)
สตริงใน Swift รองรับ Unicode และสามารถเชื่อมต่อหรือจัดรูปแบบได้ด้วยการแทรกสตริง
```swift
let name = "John"
let greeting = "Hello, \(name)!"
```
## การควบคุมการไหลของโปรแกรม (Control Flow)
Swift สนับสนุนโครงสร้างการควบคุมการไหลทั่วไป เช่น if, switch, for-in, while และลูป repeat-while
```swift
// การใช้ If-else conditions
let score = 85 // กำหนด score เท่ากับ 85
if score >= 90 { // if แรกคือการเช็คว่า score มีค่ามากกว่าหรือเท่ากับ 90 หรือไม่
print("Grade: A")
} else if score >= 80 { // else if สองคือการเช็คว่า score มีค่ามากกว่าหรือเท่ากับ 80 หรือไม่
print("Grade: B")
} else { // else หมายถึงเงื่อนไขที่ไม่เกี่ยวกับด้านบน
print("Grade: C")
}
// การใช้ loop ของใน array
let fruits = ["Apple", "Banana", "Cherry"]
for fruit in fruits {
print(fruit)
}
```
## ฟังก์ชัน (Functions)
ฟังก์ชันใน Swift ถูกกำหนดด้วยคำว่า func สามารถรับพารามิเตอร์และคืนค่าผลลัพธ์ได้
```swift
func greet(person: String) -> String {
return "Hello, \(person)!"
}
let greetingMessage = greet(person: "Alice")
print(greetingMessage)
```
## สรุป
ภาษา Swift เป็นภาษาที่ง่ายและเราสามารถเขียน Swift และไปใช้งานได้ในหลาย ๆ อุปกรณ์ของ Apple ซึ่งทำให้มีโอกาสในการสร้างแอป และจากอันดับของ [Tiobe](https://www.tiobe.com/tiobe-index) ตอนนี้ภาษา Swift อยู่ในลำดับที่ 12 ก็ยังถือว่าเป็นกลุ่มเฉพาะมาก ๆ ถ้าใครสนใจที่จะสร้างแอป iphone เป็นของตัวเองและยังสามารถ link ไปในอุปกรณ์อื่น ๆ ของ apple ได้ ผมคิดว่าการลงทุนเรียนรู้ Swift เป็นอะไรที่คุ้มค่ามาก ๆ
สุดท้ายนี้ เป็นแค่การเล่าถึงภาษา swift แบบเบื้องต้นมาก ๆ หวังว่าจะทำให้ผู้อ่านรู้สึกตื่นเต้นกับการเขียนโปรแกรมบนภาษา Swift แล้วพบกันในบทหน้าครับ
## ประเภทของข้อมูล (Data Types)
ใน Swift มีประเภทข้อมูลหลายชนิด เช่น
* Int: ตัวเลขจำนวนเต็ม
* Float และ Double: ตัวเลขทศนิยม
* Bool: ค่าบูลีน (true หรือ false)
* String: ชุดของตัวอักษร
ในบทต่อไปผมจะพาไปดู data type ชนิดอื่น ๆ อีกครั้ง
```swift
let anInteger: Int = 100
let aDouble: Double = 3.14
let aBoolean: Bool = true
let aString: String = "Hello, World!"
```
## สตริงและการแทรกสตริง (Strings and String Interpolation)
สตริงใน Swift รองรับ Unicode และสามารถเชื่อมต่อหรือจัดรูปแบบได้ด้วยการแทรกสตริง
```swift
let name = "John"
let greeting = "Hello, \(name)!"
```
## การควบคุมการไหลของโปรแกรม (Control Flow)
Swift สนับสนุนโครงสร้างการควบคุมการไหลทั่วไป เช่น if, switch, for-in, while และลูป repeat-while
```swift
// การใช้ If-else conditions
let score = 85 // กำหนด score เท่ากับ 85
if score >= 90 { // if แรกคือการเช็คว่า score มีค่ามากกว่าหรือเท่ากับ 90 หรือไม่
print("Grade: A")
} else if score >= 80 { // else if สองคือการเช็คว่า score มีค่ามากกว่าหรือเท่ากับ 80 หรือไม่
print("Grade: B")
} else { // else หมายถึงเงื่อนไขที่ไม่เกี่ยวกับด้านบน
print("Grade: C")
}
// การใช้ loop ของใน array
let fruits = ["Apple", "Banana", "Cherry"]
for fruit in fruits {
print(fruit)
}
```
## ฟังก์ชัน (Functions)
ฟังก์ชันใน Swift ถูกกำหนดด้วยคำว่า func สามารถรับพารามิเตอร์และคืนค่าผลลัพธ์ได้
```swift
func greet(person: String) -> String {
return "Hello, \(person)!"
}
let greetingMessage = greet(person: "Alice")
print(greetingMessage)
```
## สรุป
ภาษา Swift เป็นภาษาที่ง่ายและเราสามารถเขียน Swift และไปใช้งานได้ในหลาย ๆ อุปกรณ์ของ Apple ซึ่งทำให้มีโอกาสในการสร้างแอป และจากอันดับของ [Tiobe](https://www.tiobe.com/tiobe-index) ตอนนี้ภาษา Swift อยู่ในลำดับที่ 12 ก็ยังถือว่าเป็นกลุ่มเฉพาะมาก ๆ ถ้าใครสนใจที่จะสร้างแอป iphone เป็นของตัวเองและยังสามารถ link ไปในอุปกรณ์อื่น ๆ ของ apple ได้ ผมคิดว่าการลงทุนเรียนรู้ Swift เป็นอะไรที่คุ้มค่ามาก ๆ
สุดท้ายนี้ เป็นแค่การเล่าถึงภาษา swift แบบเบื้องต้นมาก ๆ หวังว่าจะทำให้ผู้อ่านรู้สึกตื่นเต้นกับการเขียนโปรแกรมบนภาษา Swift แล้วพบกันในบทหน้าครับ